Maya
OpenPype global tools
Working with OpenPype in Maya
OpenPype is here to ease you the burden of working on project with lots of collaborators, worrying about naming, setting stuff, browsing through endless directories, loading and exporting and so on. To achieve that, OpenPype is using concept of being "data driven". This means that what happens when publishing is influenced by data in scene. This can by slightly confusing so let's get to it with few examples.
Publishing models
Intro
Publishing models in Maya is pretty straightforward. Create your model as you
need. You need to adhere to specifications of your studio that can be different
between studios and projects but by default your geometry has to be named properly.
For example sphere_GEO or cube1_GEO. Geometry needs to have freezed transformations
and must reside under one group, for example model_GRP.
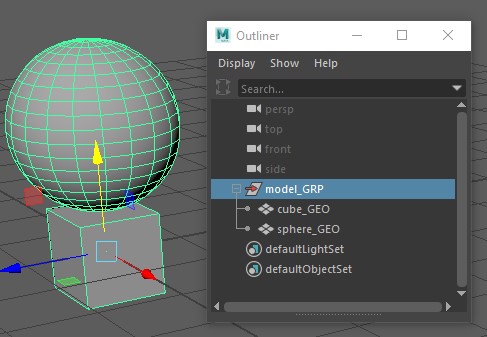
Note that sphere_GEO has frozen transformations.
Creating instance
Now create Model instance from it to let OpenPype know what in the scene you want to publish. Go OpenPype → Create... → Model
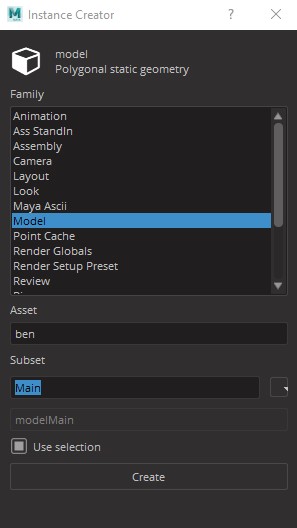
Asset field is a name of asset you are working on - it should be already filled
with correct name as you've started Maya or switched context to specific asset. You
can edit that field to change it to different asset (but that one must already exists).
Subset field is a name you can decide on. It should describe what kind of data you
have in the model. For example, you can name it Proxy to indicate that this is
low resolution stuff. See Subset.
LOD support
By changing subset name you can take advantage of LOD support in OpenPype. Your asset can contain various resolution defined by different subsets. You can then switch between them very easy using Inventory (Manage). There LODs are conveniently grouped so they don't clutter Inventory view.
Name your subset like main_LOD1. Important part is that _LOD1. You can have as many LODs as you need.
Read-only field just under it show final subset name, adding subset field to name of the group you have selected.
Use selection checkbox will use whatever you have selected in Outliner to be
wrapped in Model instance. This is usually what you want. Click on Create button.
You'll notice then after you've created new Model instance, there is new set
in Outliner called after your subset, in our case it is modelMain.
And that's it, you have your first model ready to publish.
Now save your scene (if you didn't do it already). You will notice that path
in Save dialog is already set to place where scenes related to modeling task on
your asset should reside. As in our case we are working on asset called
Ben and on task modeling, path relative to your project directory will be
project_XY/assets/ben/work/modeling. Let's save our scene as model_test_v01.
Publishing models
Now let's publish it. Go OpenPype → Publish.... You will be presented with following window:
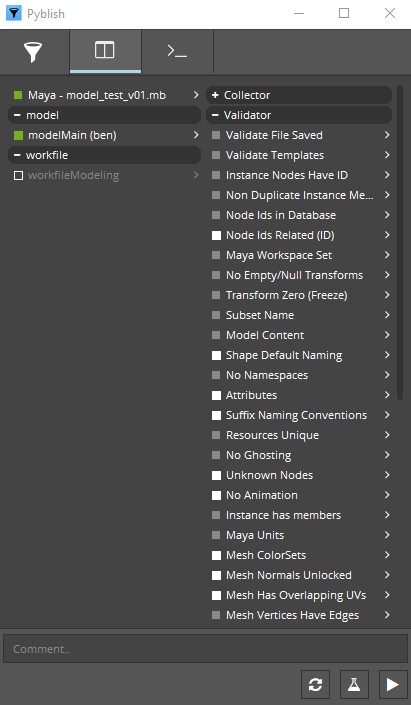
Note that content of this window can differs by your pipeline configuration. For more detail see Publisher.
Items in left column are instances you will be publishing. You can disable them by clicking on square next to them. Green square indicate they are ready for publishing, red means something went wrong either during collection phase or publishing phase. Empty one with gray text is disabled.
See that in this case we are publishing from scene file model_test_v01.mb in
Maya model named modelMain (ben) (next item). Publishing of workfile is
currently disabled (last item).
Right column lists all tasks that are run during collection, validation, extraction and integration phase. White items are optional and you can disable them by clicking on them.
Lets do dry-run on publishing to see if we pass all validators. Click on flask icon at the bottom. Validators are run. Ideally you will end up with everything green in validator section.
Fixing problems
To make things interesting, I intentionally forgot to freeze transformations
on sphere_GEO as I know it will trigger validator designed to check just this.
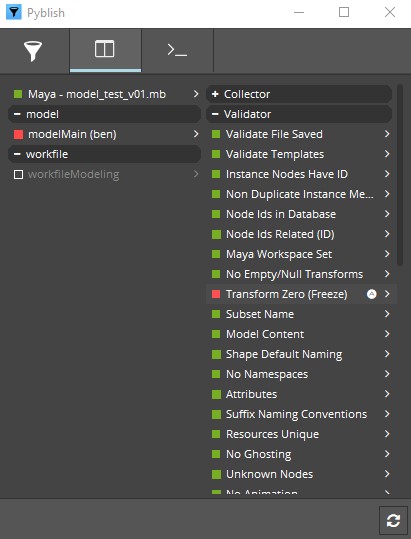
You can see our model is now marked red in left column and in right we have
red box next to Transform Zero (Freeze) validator.
You can click on arrow next to it to see more details:
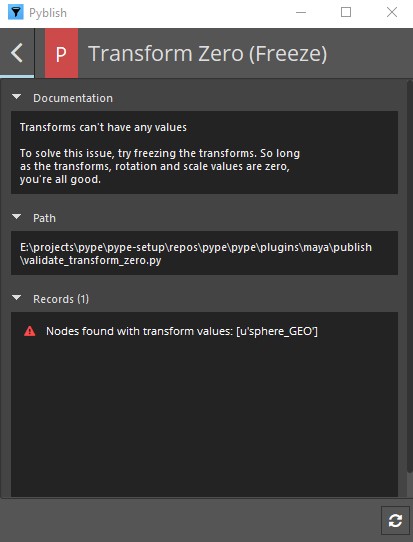
From there you can see in Records entry that there is problem with sphere_GEO.
Some validators have option to fix problem for you or just select objects that
cause trouble. This is the case with our failed validator.
In main overview you can notice little up arrow in a circle next to validator
name. Right click on it and you can see menu item select invalid. This
will select offending object in Maya.
Fix is easy. Without closing Publisher window we just freeze transformations. Then we need to reset it to make it notice changes we've made. Click on arrow circle button at the bottom and it will reset Publisher to initial state. Run validators again (flask icon) to see if everything is ok.
It should be now. Write some comment if you want and click play icon button when ready.
Publish process will now take its course. Depending on data you are publishing it can take a while. You should end up with everything green and message Finished successfully ... You can now close publisher window.
To check for yourself that model is published, open
Asset Loader - OpenPype → Load....
There you should see your model, named modelMain.
Look development
Look development in OpenPype is easy. It helps you with versioning different kinds of shaders and easy switching between them.
Let se how it works.
Loading model
In this example I have already published model of Buddha. To see how to publish model with OpenPype see Publishing Model.
First of lets start with empty scene. Now go OpenPype → Load...
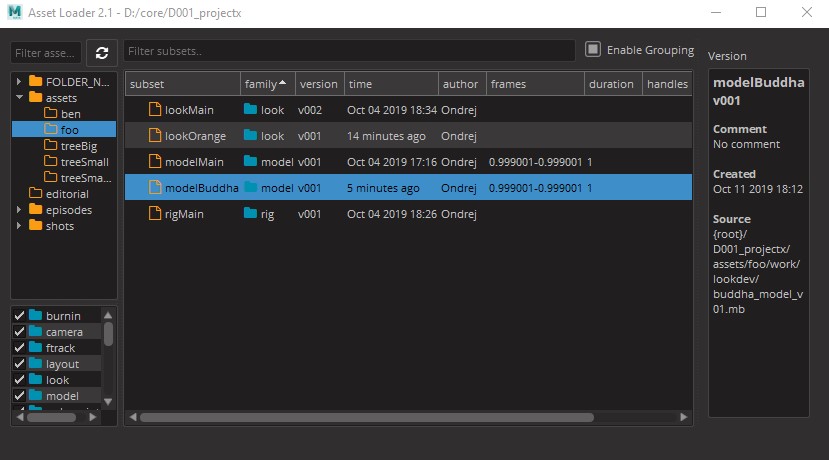
Here I am loading modelBuddha, its version 1 for asset foo. Just right-click
on it and select Reference (abc). This will load model into scene as alembic.
Now you can close Loader window.
Creating look
Now you can create whatever look you want. Assign shaders, textures, etc. to model. In my case, I assigned simple Arnolds aiSurfaceShader and changed its color to red.
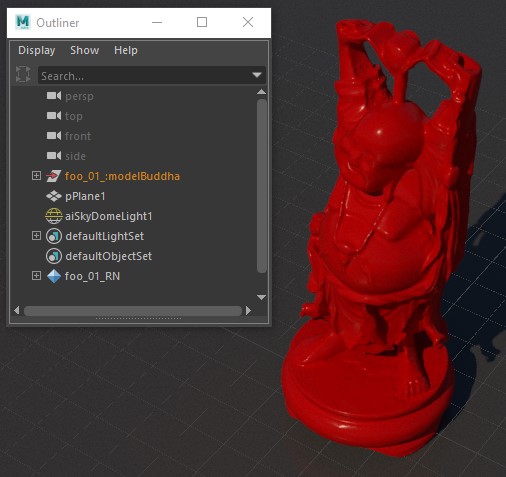
I am quite happy with it so I want to publish it as my first look.
Publishing look
Select your model in outliner and ho OpenPype → Create.... From there
select Look. Make sure use selection checkbox is checked.
Mine subset name is Main. This will create Look instance with a name lookMain.
Close Creator window.
Now save your scene, give it some sensible name. Next, go OpenPype → Publish. This process is almost identical as publishing models, only different Validators and other plugins will be used.
This should be painless and cause no trouble so go ahead, click play icon button at the bottom and it will publish your look.
publishing multiple looks
You can reference same model into scene multiple times, change materials on every instance with what you need. Then on every model create Look instance. When publishing all those Look instances will be published at same time.
Loading looks into models
Now lets see how look are applied. Start new empty scene, load your published model there as before (using Reference (abc)). If you didn't notice until now, there are few yellow icons in left shelf:
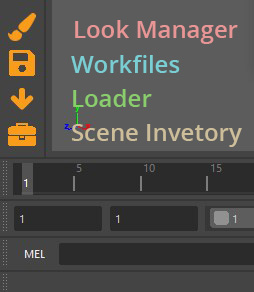
Those are shortcuts for Look Manager, Work Files, Load, and Manage (Inventory).
Those can be found even in top menu, but that depends on your studio setup.
You are interested now in Look Manager - first item with brush icon. Select your Buddha model and open Look Manager.
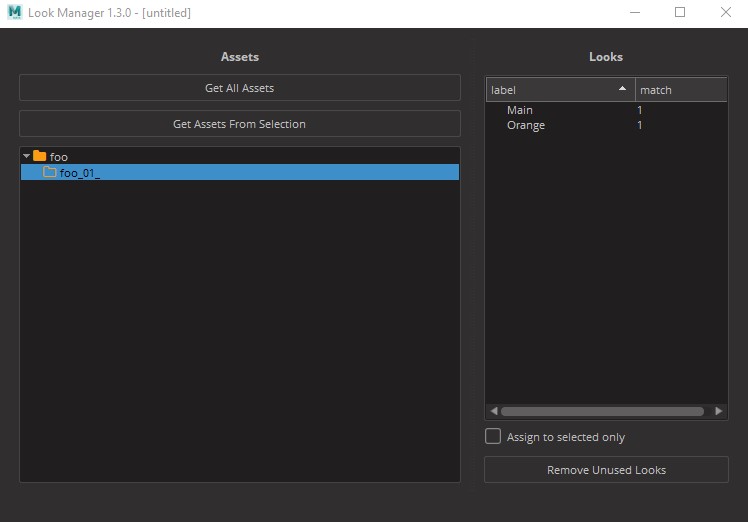
This is Look Manager window. Yours would be empty until you click Get All Assets or Get Assets From Selection. You can use later to quick assign looks if you have multiple assets loaded in scene. Click on one of those button now.
You should now see all assets and their subsets loaded in scene, and on right side all applicable published looks.
Select you asset and on the right side right click on Main look. Apply it.
You notice that Buddha model is now red, materials you've published are now applied to it.
That way you can create looks as you want and version them using OpenPype.
Setting scene data
Maya settings concerning framerate, resolution and frame range are handled by OpenPype. If set correctly in Ftrack, Maya will validate you have correct fps on scene save and publishing offering way to fix it for you.
For resolution and frame range, use OpenPype → Set Frame Range and OpenPype → Set Resolution
Creating rigs with OpenPype
Creating and publishing rigs with OpenPype follows similar workflow as with other data types. Create your rig and mark parts of your hierarchy in sets to help OpenPype validators and extractors to check and publish it.
Preparing rig for publish
When creating rigs, it is recommended (and it is in fact enforced by validators) to separate bones or driven objects, their controllers and geometry so they are easily managed. Currently OpenPype doesn't allow to publish model at the same time as its rig so for demonstration purposes, I'll first create simple model for robotic arm, just made out of simple boxes and I'll publish it.
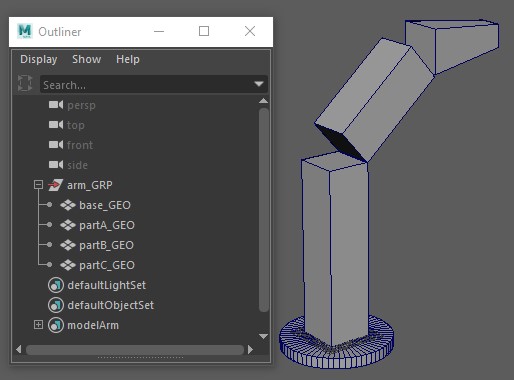
For more information about publishing models, see Publishing models.
Now let's start with empty scene. Load your model - OpenPype → Load..., right click on it and select Reference (abc).
I've created a few bones in rig_GRP, their controllers in controls_GRP and
placed the rig's output geometry in geometry_GRP. Naming of the groups is not important - just adhere to
your naming conventions. Then I parented everything into a single top group named arm_rig.
With the prepared hierarchy it is time to create a Rig instance in OpenPype.
Select the top group of your rig and go to OpenPype → Create.... Select Rig.
A publish set for your rig is created in your scene to mark rig parts for export.
Notice that it has two subsets - controls_SET and out_SET. Put your controls into controls_SET
and geometry to out_SET. You should end up with something like this:
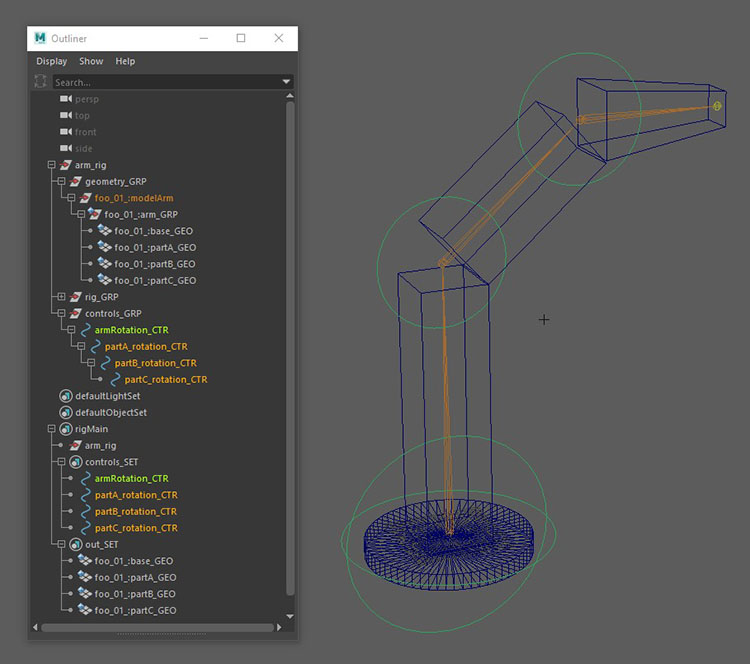
controls_SET and out_SET contents
It is totally allowed to put the geometry_GRP in the out_SET as opposed to
the individual meshes - it's even recommended. However, the controls_SET
requires the individual controls in it that the artist is supposed to animate
and manipulate so the publish validators can accurately check the rig's
controls.
Publishing rigs
Publishing rigs is done in a same way as publishing everything else. Save your scene and go OpenPype → Publish. When you run validation you'll most likely run into a few issues at first. Although a number of them will seem to be intimidating you will find out they are mostly minor things, easily fixed and are there to optimize your rig for consistency and safe usage by the artist.
Non Duplicate Instance Members (ID) - This will most likely fail because when creating rigs, we usually duplicate few parts of it to reuse them. But duplication will duplicate also ID of original object and OpenPype needs every object to have unique ID. This is easily fixed by Repair action next to validator name. click on little up arrow on right side of validator name and select Repair form menu.
Joints Hidden - This is enforcing joints (bones) to be hidden for user as animator usually doesn't need to see them and they clutter his viewports. So well behaving rig should have them hidden. Repair action will help here also.
Rig Controllers will check if there are no transforms on unlocked attributes of controllers. This is needed because animator should have ease way to reset rig to it's default position. It also check that those attributes doesn't have any incoming connections from other parts of scene to ensure that published rig doesn't have any missing dependencies.
Loading rigs
You can load rig with Loader. Go OpenPype → Load..., select your rig, right click on it and Reference it.
Animation instances
Whenever you load a rig an animation publish instance is automatically created for it. This means that if you load a rig you don't need to create a pointcache instance yourself to publish the geometry. This is all cleanly prepared for you when loading a published rig.
Missing animation instance for your loaded rig?
Did you accidentally delete the animation instance for a loaded rig? You can recreate it using the Recreate rig animation instance inventory action.
Point caches
OpenPype is using Alembic format for point caches. Workflow is very similar as other data types.
Creating Point Caches
To create point cache just create whatever hierarchy you want and animate it. Select its root and Go OpenPype → Create... and select Point Cache.
After that, publishing will create corresponding abc files.
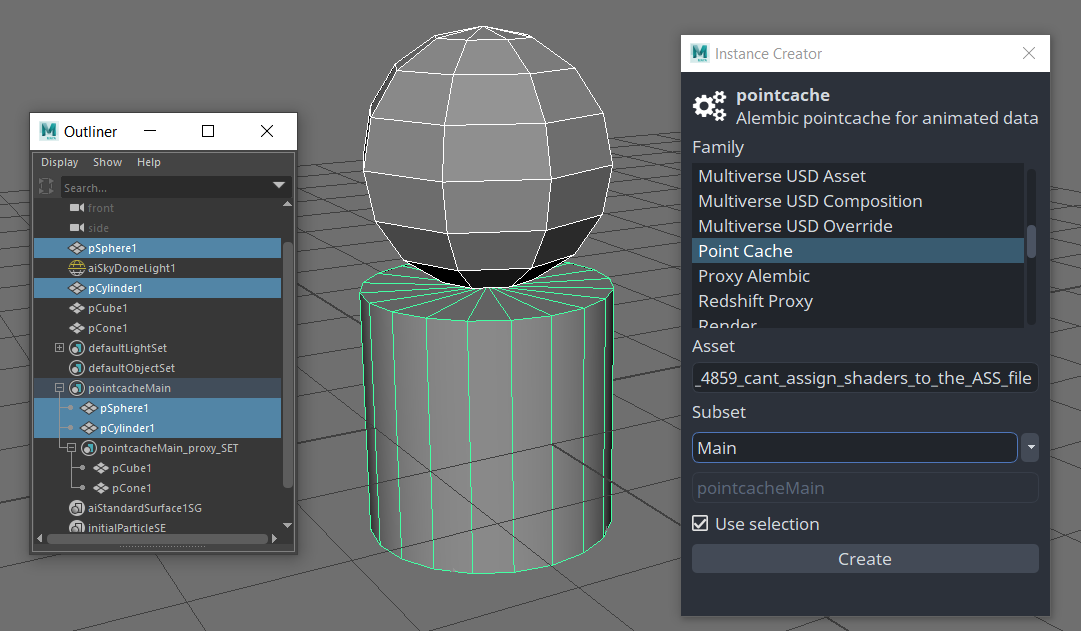
When creating the instance, a objectset child proxy will be created. Meshes in the proxy objectset will be the viewport representation where loading supports proxies. Proxy representations are stored as resources of the subset.
Example setup:
Options
- Frame Start: which frame to start the export at.
- Frame End: which frame to end the export at.
- Handle Start: additional frames to export at frame start. Ei. frame start - handle start = export start.
- Handle Start: additional frames to export at frame end. Ei. frame end + handle end = export end.
- Step: frequency of sampling the export. For example when dealing with quick movements for motion blur, a step size of less than 1 might be better.
- Refresh: refresh the viewport when exporting the pointcache. For performance is best to leave off, but certain situations can require to refresh the viewport, for example using the Bullet plugin.
- Attr: specific attributes to publish separated by
;. - AttrPrefix: specific attributes which start with this prefix to publish separated by
;. - Include User Defined Attribudes: include all user defined attributes in the publish.
- Farm: if your studio has Deadline configured, artists could choose to offload potentially long running export of pointache and publish it to the farm. Only thing that is necessary is to toggle this attribute in created pointcache instance to True.
- Priority: Farm priority.
Loading Point Caches
Loading point cache means creating reference to abc file with Go OpenPype → Load....
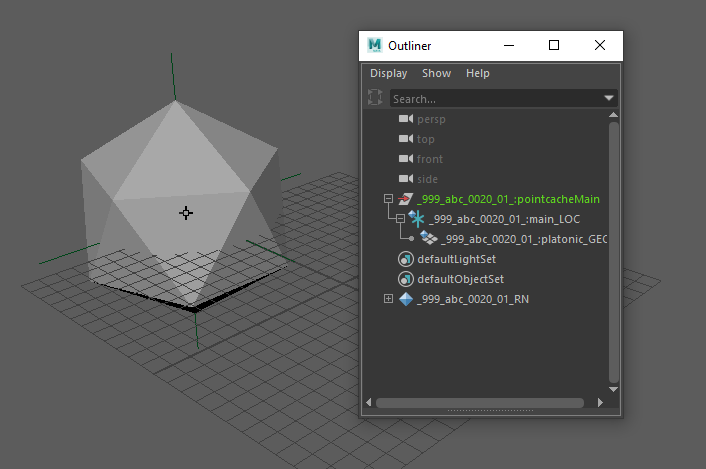
Example result:
Set dressing in Maya
Set dressing is term for easily populate complex scenes with individual parts. OpenPype allows to version and manage those sets.
Publishing Set dress / Layout
Working with Set dresses is very easy. Just load your assets into scene with Loader (OpenPype → Load...). Populate your scene as you wish, translate each piece to fit your need. When ready, select all imported stuff and go OpenPype → Create... and select Set Dress or Layout. This will create set containing your selection and marking it for publishing.
set dress vs layout
Currently set dress and layout are functionally identical
Now you can publish is with OpenPype → Publish.
Loading Set dress / Layout
You can load Set dress / Layout using Loader (OpenPype → Load...). Select you layout or set dress, right click on it and select Reference Maya Ascii (ma). This will populate your scene with all those models you've put into layout.
Rendering with OpenPype
OpenPype in Maya can be used for submitting renders to render farm and for their subsequent publishing. Right now OpenPype support AWS Thinkbox Deadline and Royal Render.
- For setting up Royal Render support see admin section
- For setting up Deadline support see here
Creating basic render setup
If you want to submit your render to farm, just follow these simple steps.
Preparing scene
Lets start with empty scene. First I'll pull in my favorite Buddha model. OpenPype → Load..., select model and right+click to pop up context menu. From there just click on Reference (abc).
Next, I want to be sure that I have same frame range as is set on shot I am working on. To do this just OpenPype → Set Frame Range. This should set Maya timeline to same values as they are set on shot in Ftrack for example.
I have my time set, so lets create some animation. We'll turn Buddha model around for 50 frames (this is length of my timeline).
Select model, go to first frame, key Y axis rotation, go to last frame, enter 360 to Channel Editor Y rotation, key it and its done. If you are not sure how to do it, you are probably reading wrong documentation.
Now let set up lights, ground and camera. I am lazy so I create Arnolds Skydome light:
Arnold → Lights → Skydome Light. As ground simple Plane will suffice and I'll set
my perspective view as I like and create new camera from it (CTRL+SHIFT+C) and rename
it from persp1 to mainCamera.
One last thing, I'll assign basic aiSurfaceShader to my Buddha and do some little tweaks on it.
Prepare scene for submission
As we have working simple scene we can start preparing it for rendering. OpenPype is fully utilizing Render Setup layers for this. First of all, we need to create Render instance to tell OpenPype what to do with renders. You can easily render locally or on render farm without it, but Render instance is here to mark render layers you want to publish.
Lets create it. Go OpenPype → Create.... There select Render from list. If you keep
checked Use selection it will use your current Render Layers (if you have them). Otherwise,
if no render layers is present in scene, it will create one for you named Main and under it
default collection with * selector.
OpenPype will try to connect to render farm and fetch machine pool list.
So now my scene now looks like this:
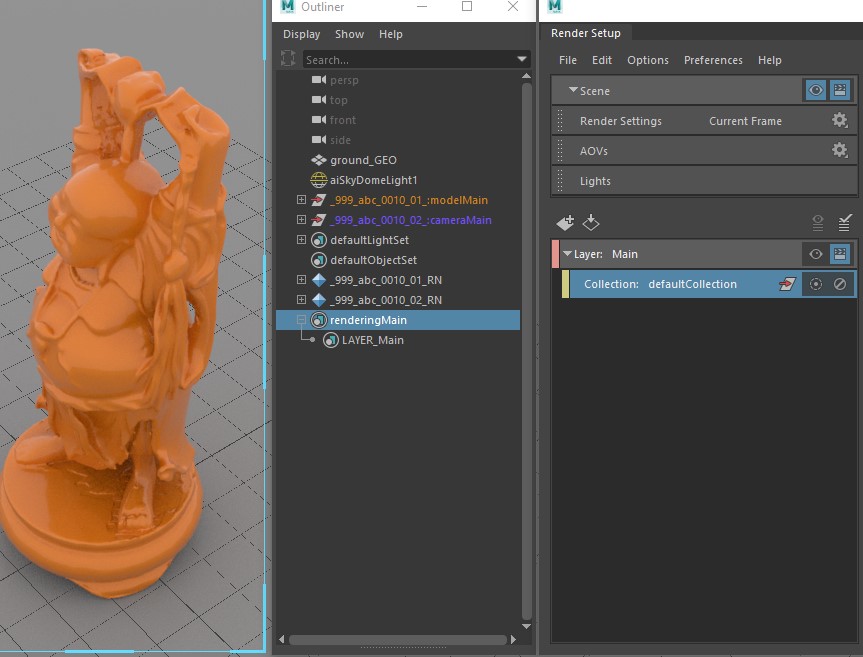
You can see that it created renderingMain set and under it LAYER_Main. This set corresponds to
Main render layer in Render Setup. This was automatically created because I had not created any
render layers in scene before. If you already have layers and you use Use selection, they will
appear here, prefixed with LAYER_. Those layer set are created whenever you create new layer in
Render Setup and are deleted if you delete layer in Render Setup. However if you delete LAYER_ set,
layer in Render Setup isn't deleted. It just means it won't be published.
Creating Render instance will also set image prefix in render settings to OpenPype defaults based on
renderer you use - for example if you render with Arnold, it is maya/<Scene>/<RenderLayer>/<RenderLayer>_<RenderPass>.
There are few setting on Render instance renderingMain in Attributes Editor:
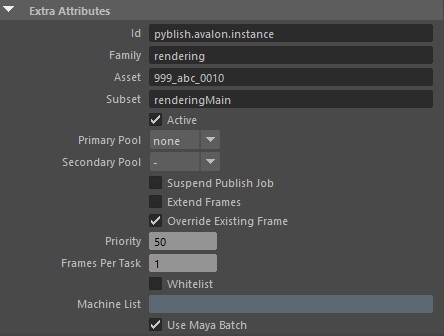
Few options that needs explaining:
Primary Pool- here is list of pool fetched from server you can select from.Suspend publish Job- job sent to farm will not start render automatically but is in waiting state.Extend Frames- if checked it will add new frames to previous render, so you can extend previous image sequence.Override Existing Frame- will overwrite file in destination if they existsPriorityis priority of job on farmFrames Per Taskis number of sequence division between individual tasks (chunks) making one job on farm.
Now if you run publish, you notice there is in right column new item called
Render Layers and in it there is our new layer Main (999_abc_0010) [1-10]. First part is
layer name, second (999_abc_0010) is asset name and rest is frame range.
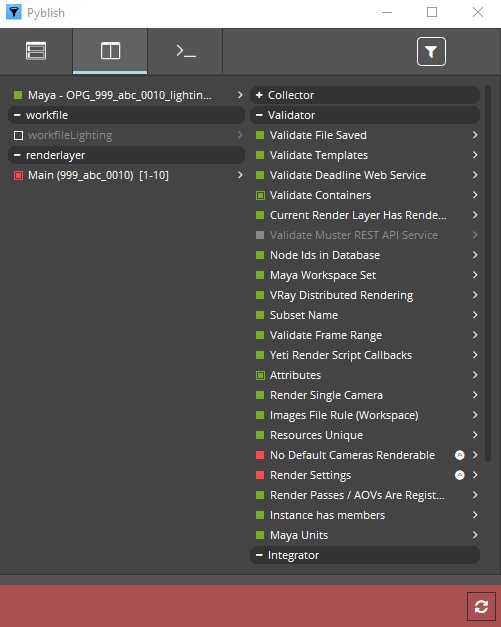
You see I already tried to run publish but was stopped by few errors. Lets go through them one by one just to see what we need to set up further in scene for successful publish.
No Default Cameras Renderable is telling me:
Renderable default cameras found: [u'|persp|perspShape']
and so can be resolved by simple change in Main layer render settings.
All I have to do is just remove the persp camera from render settings and add there correct camera.
This leaves me only with Render Settings error. If I click on it to see details, I see it has problem with animation not being enabled:
Animation needs to be enabled. Use the same frame for start and end to render single frame
Go to Render Settings, select your render layer and in Common tab change
in File Output Frame/Animation ext to whatever you want, just not Single Frame.
Set Frame Range Start frame and End frame according your needs.
If you run into problems with image file prefix - this should be set correctly when
creating Render instance, but you can tweak it. It needs to begin with maya/<Scene> token
to avoid render conflicts between DCCs. It needs to have <RenderLayer> or <Layer> (vray) and
<RenderPass> or <Aov> (vray). If you have more then one renderable cameras, add <Camera> token.
Sane default for arnold, redshift or renderman is:
maya/<RenderLayer>/<RenderLayer>_<RenderPass>
and for vray:
maya/<Layer>/<Layer>
Doing OpenPype → Set Resolution will set correct resolution on camera.
Scene is now ready for submission and should publish without errors.
what happens when I publish my render scene
When publishing is finished, job is created on farm. This job has one more dependent job connected to itself. When render is finished, this other job triggers in and run publish again, but this time it is publishing rendered image sequence and creating quicktime movie for preview from it. Only those rendered sequences that have beauty AOV get preview as it doesn't make sense to make it for example from cryptomatte.
Attaching render to subset
You can create render that will be attached to another subset you are publishing, rather than being published on its own. Let's assume, you want to render a model turnaround.
In the scene from where you want to publish your model create Render subset. Prepare your render layer as needed and then drag
model subset (Maya set node) under corresponding LAYER_ set under Render instance. During publish, it will submit this render to farm and
after it is rendered, it will be attached to your model subset.
Tile Rendering
Deadline
This feature is only supported when using Deadline. See here for setup.
On the render instance objectset you'll find:
Tile Rendering- for enabling tile rendering.Tile X- number of tiles in the X axis.Tile Y- number of tiles in the Y axis.
When submittig to Deadline, you'll get:
- for each frame a tile rendering job, to render each from Maya.
- for each frame a tile assembly job, to assemble the rendered tiles.
- job to publish the assembled frames.
Render Setups
Publishing Render Setups
OpenPype can publish whole Render Settings setup. You can then version in and load it to any Maya scene. This helps TDs to distribute per asset/shots render settings for Maya.
To publish render settings, go OpenPype → Create... and select Render Setup Preset.
In your scene will appear set rendersetup<subset>. This one has no settings, only its presence
in scene will trigger publishing of render settings.
When you publish scene, current settings in Render Settings will be serialized to json file.
Loading Render Setups
In any scene, you can load published render settings with OpenPype → Load.... Select your published render setup settings, right+click on it and select Load RenderSetup template.
This will load and parse json file and apply all setting there to your Render Setting.
warning
This will overwrite all setting you already have.
Reviews
OpenPype supports creating review video for almost any type of data you want to publish. What we call review video is actually playblast or capture (depending on terminology you are familiar with) made from pre-defined camera in scene. This is very useful in cases where you want to add turntable preview of your model for example. But it can be used to generate preview for animation, simulations, and so on. You can either publish review as separate subset version, or you can attach generated video to subset you are publishing - for example attach video of turntable rotation to published model as in following example.
Setting scene for review extraction
Lets see how review publishing works on simple scene. We will publish model with turntable preview video.
I'll be using Stanford University dragon model. Start with empty scene. Create your model, import it or load from OpenPype. I'll just import model as OBJ file.
After we have our model in, we need to set everything to be able to publish it as model - for detail see Publishing models.
To recap - freeze transforms, rename it to dragon_GEO and put it into group
dragon_GRP. Then select this group and OpenPype → Create... and choose Model.
Now, lets create camera we need to generate turntable video. I prefer to animate camera itself and not model because all animation keys will be associated with camera and not model we want to publish.
I've created camera, named it reviewCamera and parent it under reviewRotation_LOC
locator. I set my timeline to 50 frames, key reviewRotation_LOC Y axis on frame
1 to 0 and on frame 50 to 360. I've also set animation curve between those two keys
to linear.
To mark camera to be used for review, select camera reviewCamera and go OpenPype → Create...
and choose Review.
This will create set review<subset> including selected camera. You can set few options
on this set to control review video generation:
Active- control on/off stateFrame Start- starting frame for reviewFrame End- end frame for reviewHandles- number of handle frame before and afterStep- number of stepsFps- framerate
Next step is to move your model set to review set so it will be connected to each other.
This is my scene:
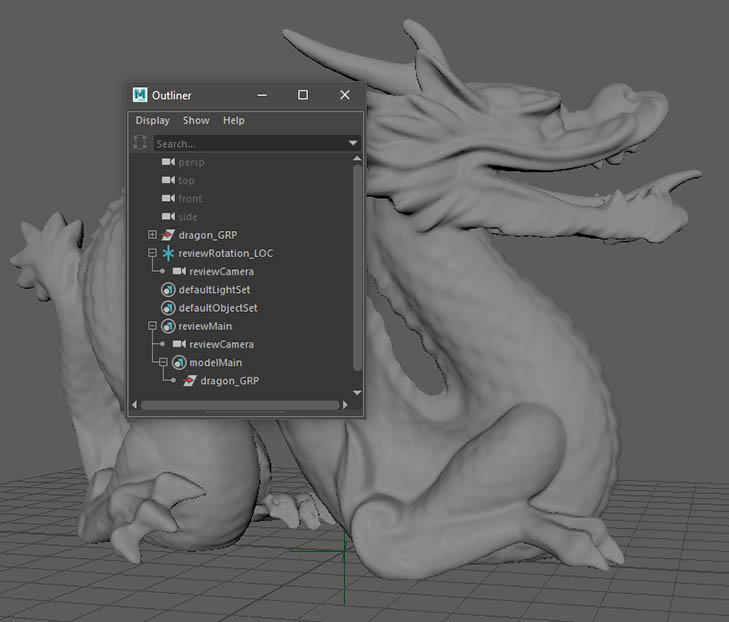
You see that modelMain in under reviewMain with reviewCamera.
* note that I had to fix UVs and normals on Stanford dragon model as it wouldn't pass model validators
Publishing model with review
You can now publish your model and generate review video. Go OpenPype → Publish..., validate if you will, and publish it. During publishing, Maya will create playblast for whole frame range you've specified, then it will pass those frames to ffmpeg. That will create video file, pass it to another extractor creating burnins in it and finally uploading this video to ftrack with your model (or other type) published version. All parts of this process - like what burnins, what type of video file, settings for Maya playblast - can be customized by your TDs. For more information about customizing review process refer to admin section.
If you don't move modelMain into reviewMain, review will be generated but it will
be published as separate entity.
Inventory Actions
Connect Geometry
This action will connect geometries between containers.
Usage
Select 1 container of type animation or pointcache, then 1+ container of any type.
Details
The action searches the selected containers for 1 animation container of type animation or pointcache. This animation container will be connected to the rest of the selected containers. Matching geometries between containers is done by comparing the attribute cbId.
The connection between geometries is done with a live blendshape.
Recreate rig animation instance
This action can regenerate an animation instance for a loaded rig, for example for when it was accidentally deleted by the user.
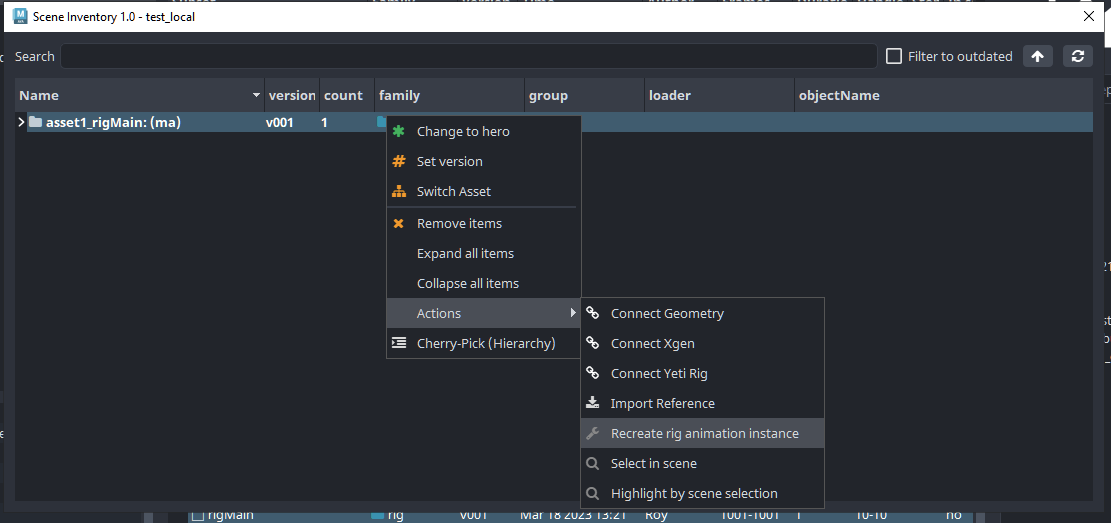
Usage
Select 1 or more container of type rig for which you want to recreate the
animation instance.